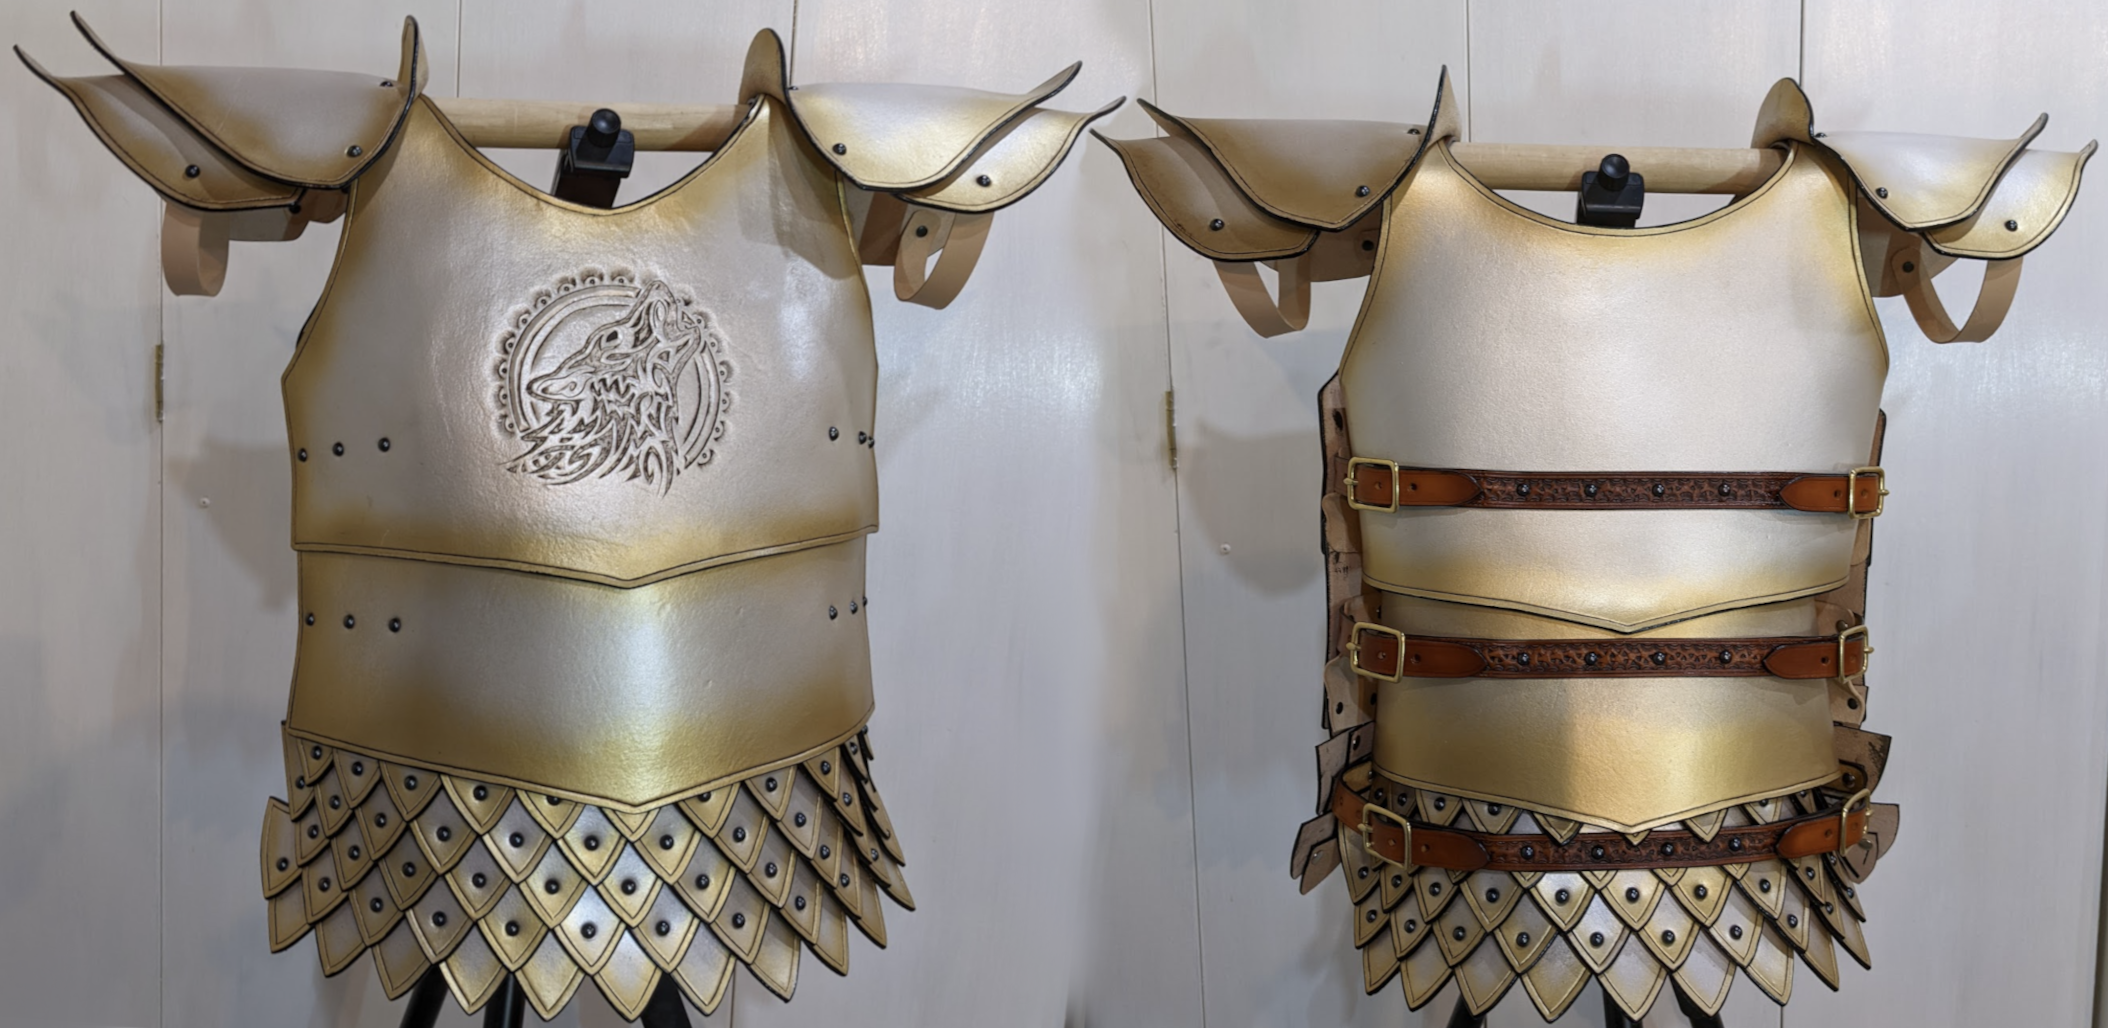
Hand crafted leather fantasy armor. Front and rear.
I'm Colin, an artisanal leather craftsman in northern Georgia, USA. I've been practicing traditional leather techniques for over 14 years, and I love turning raw materials into unique works of art. I also like to demonstrate and teach the skills of this ancient trade to others.
I was recently commissioned by a LARP (that is, live-action role play) participant to make a fantasy-inspired leather breastplate and pauldrons (shoulder armor). Read on, and you'll learn about the process that transformed a few measurements and a vague idea into a one-of-a-kind completed piece.
Initially there wasn't much to go by in terms of direction. The customer wanted it to be made of leather, but to look like metal. The main aesthetic clue was that they wanted "adamantium," a fictitious nearly-magical metal somewhat analogous to titanium. It was also to have an air of enchantment about it, in keeping with the "magic" theme.
Once the measurements came in, I plotted them out using a ruler and a square, and then drew a basic torso to those dimensions. I would later use tracing paper to draw a concept sketch to the customer's proportions. This isn't as hard as it sounds: I knew that the armor would be constructed in two halves (front and back), and so all I had to do was cut all of the measurements in half, then draw that out on paper. (Geometry time: because we're essentially taking a cylinder and unwrapping it onto a flat surface, it comes out looking a little distorted. As you can see from the image below, on paper it looks like the customer has gained a bit of weight. Pay this no mind!)
Cutting circumference measurements in half produces a slightly distorted, but usable, torso. This is useful if, like me, you're not great at drawing human figures from memory!
Next I spent a bit of time thinking about a color scheme and general look. Since we were making fantasy armor, we weren't constrained to how armor might have been designed in the real world, so instead I looked to video games like Skyrim and Morrowind, and tabletop games Dungeons & Dragons for inspiration. After some browsing, I put together a very basic concept sketch. I decided that the upper third of the breastplate would be comprised of one large, solid plate. Since that would provide a nice, large area over the chest, I planned to add some kind of tooling. Beneath that, a second plate attached with straps would provide the wearer with better flexibility.
Using tracing paper, concept sketches can be drawn over the customer's measurements to maintain proper scale.
The lower third of the torso would be comprised of scales. This would be something like lamellar armor, except the lamellae would overlap one another and have a more triangular shape.
As for colors, my first impulse was to make something silvery like titanium, but with a blue hue to signify magic (taking a cue from Frodo's sword in Lord of the Rings). After making some basic decisions, I made one single, complete scale, plus a couple of unfinished ones for context, and sent a picture of it to the customer to get their sign-off. They agreed, but later changed their mind. They did like the blue, but gold was more thematic to the complete outfit that they were assembling. The armor would be silver and gold.
The initial plan was to use a silver and blue scale design for the lower portion of the breastplate. We both liked it, but the armor ended up silver and gold instead.
With the initial planning out of the way, it was time to get to work. Some basic math, based on the customer's measurements and the concept sketch, told me I needed to make about 130 of these little scales. It was definitely going to be the lion's share of the work, so I focused on that first.
First I had to cut them. I used a 2-inch English point punch (my biggest). This kind of punch is normally used for the ends of straps, but in this case greatly simplified the creation of the scales, and ensured a level of consistency such that there wouldn't be much variance in the shapes. It also saved a lot of time.
The first order of business was to cut out about 130 triangular scales. This number varies depending on the customer's measurements.
Next they had to be creased. Now, personally I think this step adds a lot to the overall aesthetic, but it's more than that. A crease compresses the fibers and helps protect against moisture. Many leatherworkers confuse this step with a stitch groove, which looks somewhat similar but actually has the opposite effect and can be detrimental.
Creases look nice and help protect the surface.
After creasing, each scale had to be painted and then an antique paste was applied. Using an airbrush, I painted a few coats of silver, and then went around each edge with gold. Once the paint was dry, I added the antique paste. This is a very messy process, and great care must be taken to keep from getting too much antique paste on the back of the leather, which can later come off in clothing or on skin. The difficulty in antiquing is not in actually applying it -- that's easy -- it's in keeping a clean enough environment, especially when working on lots of pieces.
Antique is an optional step. It is purely aesthetic, and isn't always a great idea. In this case, there was a depression created by the crease, and since I knew that the edges were going to be black, I wanted to highlight the crease in black as well. I felt the concentric black triangles would look good, and help emphasize the shape of the scales themselves. It would also match the gunmetal-black rivets I planned to use later on.
Each scale was painted, first in silver and then in gold, with an airbrush.
Antique paste was used to highlight the crease around each scale.
Antique paste is not waterproof. It must be protected. Also, it's a good idea to put a clear coat over the acrylic paint to protect that as well. So one more pass with the airbrush was necessary. I used Resolene for this. Resolene, an acrylic itself, leads to a shiny, sometimes "plastic" look on normal leather. Sometimes that's not desirable, but in this case, shiny is exactly what we wanted. It was a good fit.
With all of the surface work out of the way, it was time to work on the edges. This step is really important: it helps protect the edges of the leather from catching and taking damage, and also helps seal them against the elements. With the black antique, it also completes the look I was going for.
Beveling the edges before slicking, sanding and painting them.
At long last: a completed scale.
At this point, it was time to think about rivets. I do typically try to avoid rivets, but felt they were sort of necessary in this case, as stitching would spoil the metallic look and lacing, while realistic (depending on the armor), didn't match the aesthetic the customer wanted.
Before marking and punching holes, I laid the scales out on the table roughly corresponding to where they would be positioned on the armor. This was important. Most scales required 3 holes, but a few did not. Specifically, the bottom row needed only 2 holes, as did several of the scales on the right and left.
Pre-positioning the scales to determine which ones needed 3 holes and which ones needed only 2.
The rivets also had to be positioned consistently. There had to be minimal variance from one scale to the next, or else they wouldn't rest evenly. To accomplish this, I made a cardboard template in the same shape and size as a single scale, (which was only possible due to use of a punch, as above), and then initially punched the rivet holes on that template. Then I simply laid the template over each scale, marked the position of each hole, and moved on. After all holes were marked, I punched them.
Punching holes into each scale after marking their positions (top left).
The scales were now complete, but it wasn't time to set any rivets, yet. The armor would come together in two halves, so there needed to be some way to secure the two halves together. I decided to add six straps -- three on each side of the armor -- and six buckles. They would join the existing rivets, so no new holes would need to be punched. I felt that doing this would maintain a consistent look for the armor. Since two of the six straps would connect at the scales, setting rivets would have to wait until the straps were completed.
Many of the same steps as above apply to straps. They have to be cut to the right size, holes marked and punched, and edges finished. As usual, planning ahead pays dividends. I also decided to do a bit of tooling on the blank space between the buckles.
Straps have been cut, punched, tooled, and beveled.
Buckle straps after adding dye. Still wet!
Billet ends after adding dye. Still wet!
After preparing the straps but before finishing the edges, I also dyed, antiqued and added a few light coats of Resolene. Using light coats, applied with an airbrush, helped keep them from looking too "plastic," which is a common complaint when using acrylic top coats. They came out beautifully!
I opted to stitch the buckles into place. It's more secure, distributes force more evenly, and since the straps are meant to look like leather, (as opposed to metallic), it doesn't break the aesthetic to do so. Also, the stitches themselves are essentially invisible during use.
Finished buckle straps, with the stitching visible.
Finished billets. I love this picture!
Completed straps, with buckles stitched into place and billets in place for demonstration. The stitches lay behind the billets, and so they are essentially invisible during use.
With the straps ready to go, I was finally ready to set the rivets on the scales. I also attached the internal strap that would be used to hang the scales from the upper portions of the armor. I could have chosen to rivet them directly to the armor -- and truth be told, since this wasn't to be a hardened piece, it would still have some flexibility -- but the wearer will be much more comfortable (when bending over, for example) if the plates are hung indirectly from one another using straps.
On the topmost row of scales, I used flat rivets rather than the domed ones I was using elsewhere. This is because the top row will sit underneath the upper plate of armor, and I didn't want those domed rivets rubbing and causing the scales, potentially, to protrude uncomfortably for the wearer and make the plates rest at an awkward angle.
Scales with straps attached.
At long last, I was finally ready to move on to the rest of the torso. By now I had heard back from the customer about what sort of tooling I could put on the chest. The general theme of their outfit has to do with wolves, and after some discussion, the customer decided on a design:
The customer decided on an image of a wolf with a bit of Celtic influence tooled into the chestpiece.
Tooling complete, I moved on to painting, antiquing, sealing, and edge finishing the rest of the torso pieces. Here they are with the final coat of Resolene nearly dry, just before I moved on to finishing the edges:
It's starting to look like armor...
While the various paints and whatnot dried, there was still something I hadn't even started on: the pauldrons. Admittedly, I was putting those off until last because I wasn't quite sure how they should look. There are so many ways to do shoulder armor. Ultimately I went with a two-piece design: the upper plate would be riveted permanently into place, attached to the front and back chest plates. The lower plate would attach to the upper one with straps, allowing it to fall down over the shoulder. It would also have an additional strap through which the wearer can put their arm, to keep it secure when jumping or flailing one's arms about.
As for the aesthetic, the customer wanted something intimidating, and it's hard to go wrong with spikes. Both plates of each pauldron would therefore end in a tapered, turned-up spike to give an imposing edge to the wearer's silhouette. I also added a lip to the pauldrons near the neck. Though it's not a dedicated piece of neck protection like a gorget, it could help serve to turn away glancing blows from the side, while still affording the wearer plenty of room to turn their head. I also think it looks cool!
The four plates which, assembled will form two pauldrons. The upper plates are on the right, and the lower plates are on the left.
A lower plate, with straps riveted in place. These straps will connect it to an upper plate.
The last thing I added were a pair of straps to ride over the shoulder. This separated the front and back chest plates around the neck, giving enough room for the wearer to be able to fit it over their head. Importantly, these straps would be placed beneath everything else. Since the shoulders would take the bulk of the weight from the armor, I didn't want any ridges or other inconsistent edges which might become uncomfortable after a number of hours wearing the armor. Hopefully, these straps will act as pads to help the armor sit comfortably over the shoulders.
Simple, but important: Shoulder straps to increase comfort over the long hours of swordplay (or whatever!)
I feel it's important to note that I did not antique these, nor did I paint them. They will be placed in high-wear areas where such finishes would quickly rub off. I simply dyed the surfaces (not the backs) to keep them from standing out too much, covered that with a light coat of Resolene to help protect them, and then finished the edges. The backs, which I didn't think to photograph, were kept as clean as possible to avoid any possibility of making a mess of the wearer's clothing.
Finally, it was time to return to riveting the torso together. With all of the pieces finished, I riveted the bottoms of the middle plates to the strap that had been connected to the scales, and then added an additional strap which would connect the chest plates in the same manner:
As you can see, I again opted for flat rivets at the top of this plate. Looking at the bottom of the plate, you can see why: the chest plate will completely cover those rivets, and we don't want them protruding to cause the plates to rest at awkward angles.
And then again for the upper back plate, and repeating the whole process once more for the front.
The back, completely riveted together. Next I'll remove the billets so they can be attached to the front.
The front, completely riveted together. In this image, I removed the billets from the previous image in order to fix them into place.
Finally, I riveted the shoulder straps and pauldrons into place, and the job was complete!
I hope you've enjoyed this peak at how a custom set of fantasy armor went from concept to creation. It was a blast to make! Don't forget, I'd be happy to work on your project, too!
Below are some more pictures of the finished armor.