Behind the Scenes: How to Make a Tooled Dragon Wallet
Colin's Workshop · 9 minute read
Hand tooled. Hand stitched. One of a kind.
I'm Colin, an artisanal leather craftsman in northern Georgia, USA. I've been practicing traditional leather techniques for over 15 years, and I love turning raw materials into one-of-a-kind works of art. I also like to demonstrate and teach the skills of this ancient trade to others.
Over the next few minutes I'll go into detail about how this handmade wallet started as a bit of leather and a thought, and was transformed into a novel yet functional piece.
You can own this unique, artisan work!
I've been making a lot of wallets lately. I had it in mind to make one that's rather large; it still fits in a pocket, but it's a beefy thing with a lot of surface area. This makes it great for someone who carries a lot of cards and papers, or prefers something chunky that won't get away from them. And with so much surface area, it's a blank canvas. It was time for some tooling!
The Sketch
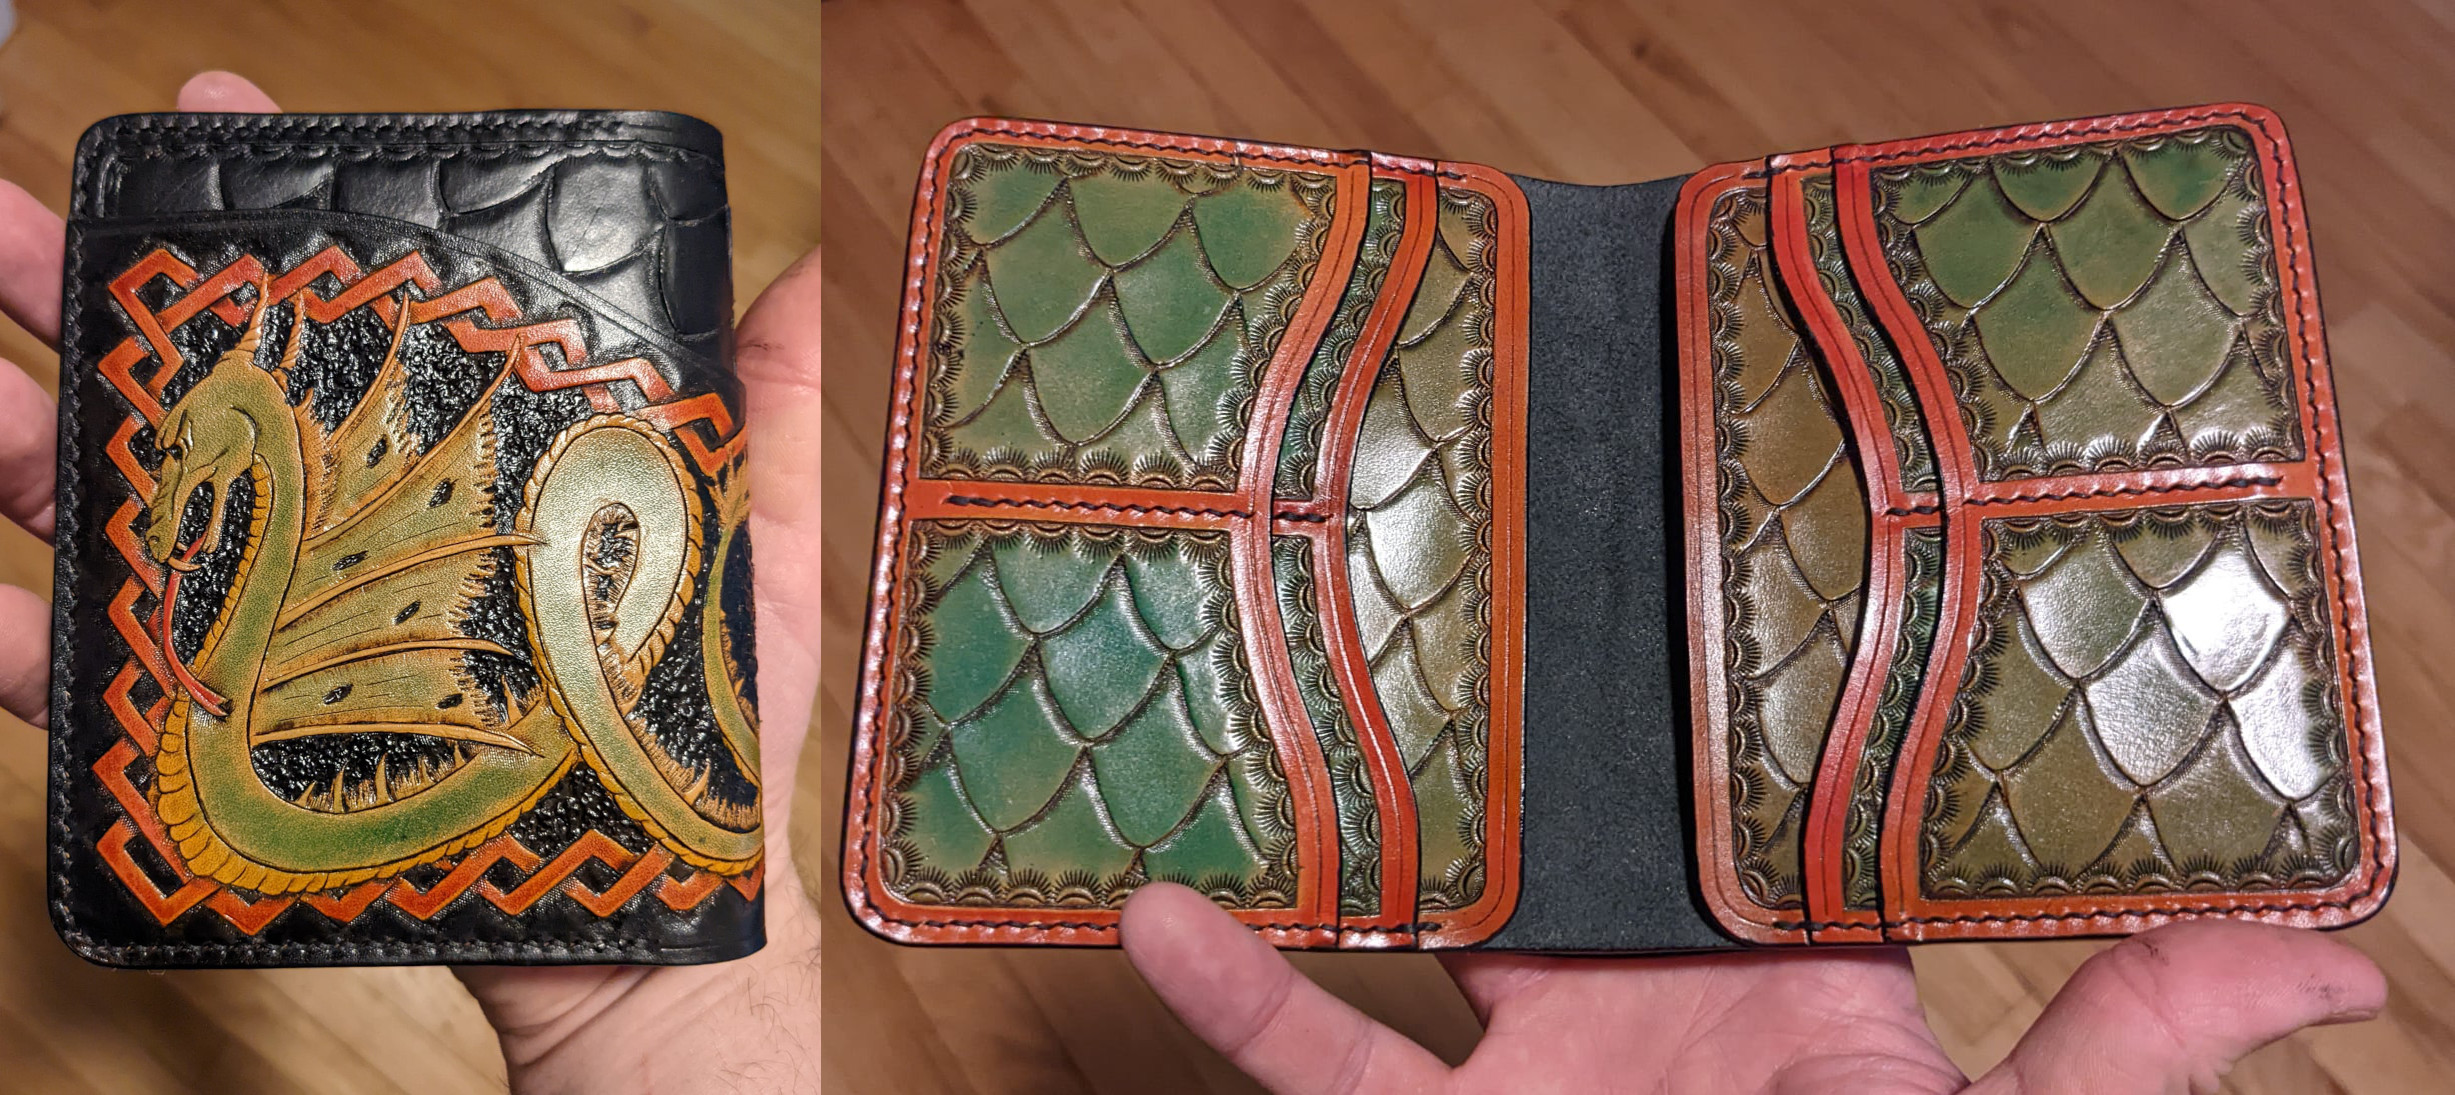
I didn't really have much of a plan, so I just started sketching. Initially I thought maybe of some kind of Sheridan-style work, but perhaps something other than floral. Then I thought, who doesn't love dragons?

I did get a bit carried away with the sketch. It ended up so detailed that there wasn't much room for anything that could be called "Sheridan". Indeed, the vast majority of the tooling would come down to beveling. That's fine. I'll save the Sheridan idea for next time.
Image Transfer
Once the sketch is completed, it needs to be transferred to leather. To do this, first I case the leather and then lay a sheet of cellophane (cling wrap) over it. This prevents the moisture from working its way upward into my sketch, which can cause it to warp and distort. Then I lay the sketch down and usually I'll try to tape it into place using painter's tape. Painter's tape is fairly kind to the leather, although I still try to adhere the tape in areas that will be trimmed from the final product. The adhesive can cause discoloration when it's removed, and it can leave traces behind which then have to be cleaned out carefully before it can be dyed. Best to avoid that process altogether.
After the sketch is in place I'll trace it using a stylus. If the leather has been cased properly, one really doesn't have to press hard to get a nice, fine line imprinted onto the leather. The finer the point on the stylus, more pressure is applied to a very small area and thus you can get away with a lighter stroke. In truth, your strokes should be as light as possible while still getting a useful result, because:
- The sketch isn't on a stable surface. It's like trying to draw with your paper on top of a sponge: it's quite easy to punch right through it, damaging the sketch, the cellophane and worst of all, your leather.
- Despite all precautions, the paper tends to stretch, perforate and otherwise distort as you trace. This means a lot of thought should be given to where you'll start and where you'll end; it also means that inevitably, some of your lines will always be out of place. The more detailed the sketch, the more you'll have to deal with this. There's always some touch-up to be done on the leather itself, and that's a tricky process, so it's best to minimize this at the outset.
Swivel Cutting
Some images require a lot of work with the swivel knife. Others need very little. This one required a ton. Because the image was fairly detailed, and because there were some lines that needed to be cut deep and bold and others that were fairly light, I actually used 3 separate knives to accomplish this process: I used a 3/8-inch hollow ground blade, a 1/4-inch filigree blade, and an 1/8-inch filigree blade. Truth be told, there were only a few lines requiring the larger knives. I did the vast majority of the work with the 1/8-inch blade.

Beveling and Backgrounding
The next task was beveling. And as I said before, this image required a lot of it. Beveling involves using a tool that is just a few millimeters wide and tapping it with a hammer to mat down an edge. I used four beveling tools for this image: a large and small textured tool, which enhances the detail and makes lines darker; and a large and small smooth tool, for giving depth to more subtle areas.

After some experimentation, I decided to use the textured tools all around the border and anywhere there is a "strong" line on the dragon -- for example, where the tails overlap. I used the smooth tools for "soft" lines, such as where the spines meet the wings.
After beveling, I used a matting tool for the background. I have these tools in a few different styles, but hadn't used this one in a while, and I quite like the look of this kind of textured background when it's dyed a dark color to contrast with the foreground.
I also used a modeling spoon to touch up a lot of the edges. A modeling spoon is a very versatile tool that can be used to make an edge more subtle, to make it stand out more, or to give it a rounded look. It can also be used for burnishing and shading, though I didn't do much of either here.
The last step as far as tooling goes was to make some decorative cuts. In this case I made just a few cuts on the wings, but did quite a lot of touch-up with the filigree blade along the spines and wingtips. This really completed those areas quite nicely; they seemed to be lacking something up to that point.
This one-of-a-kind work could be yours!
Adding Color
With the tooling completed, it was time to add some color. I dyed the border and the dragons with an airbrush, then applied black dye to the background with a paint brush. The last step was to apply an antique stain to darken and subdue the whole piece. The image was quite bright and jarring before this step; I honestly thought I'd ruined it. Unfortunately I didn't take a picture for comparison. (Or a recording; I could be heard audibly groaning as I worked...)

Antique darkens everything, and darkens it much more if a resist isn't applied; it also collects in the crevasses which highlights the tooling. I'm especially happy with how it made the wingtips, fins and spines stand out. In this case I did use a resist on the horns, tongues, and spines. I also didn't dye the horns or spines, so they remain their bright, natural leather color. The antique simply rubbed off of those.
Tooling The Body
Next up was the wallet body. I was tempted to leave it un-tooled, but as the theme of this wallet is dragons, I decided to add a pattern I developed some time ago. It results in a somewhat "scaly" look, and I like to think of it as "dragon scales". If you came to me and asked me for dragon scale tooling, you'd probably get some variation of this:

Interior Pockets
With the body complete, it was time to move on to the interior pockets. This was an interesting process. I fell in love with the natural color of the tooled leather, without any color applied. Though it seemed out of place for this wallet, I was sorely tempted not to color the pockets at all. Ultimately I would color them to match the outside, but it was almost a shame to do so. Buttero tools beautifully. I will have to make something that highlights the natural tan, soon.

Dyeing the Interior Pockets
Next up was coloring the interior pockets. I did my best to match the green and orange colors from the front. There is some variance in the green bodies of the dragons, and I attempted to replicate that variance as well.

I'm not sure this picture does it justice. All of the pieces came out wonderfully! After dyeing, I antiqued the pockets and sealed them with an acrylic. I didn't do this on the body, though: there's nothing to dye and the antique would be black-on-black. That seemed like overkill.
I think it's worth noting that quite a lot of the tooling will be covered up once the wallet is fully assembled. In the case of the body, it'll be rarely visible: only when the owner opens the wallet for cash. As for the card pockets, they'll simply never be visible. I did consider for a while whether it was even worth tooling what can't be seen. But there's the chance that the owner will try to peek inside a card pocket, or run their fingertips through it. This is a one-of-a-kind piece; it'd be a shame to cut corners on something like this. I'm not one for shortcuts. If the owner, or indeed myself, is the only one to ever know the true quality of my work, well... That's good enough for me.
The one exception is functional: I avoided tooling wherever there would eventually be a stitch line. Since the tooling requires cutting into the surface, which is the strongest part of the leather, the leather could be weakened and tears or premature failure could be introduced by stitching or skiving too close to the tooling. I won't risk that. I make my items to last.
This unique work of art could be yours.
Assembly
The next-to-last step is stitching. To me, this is always the most exciting part (rivaled perhaps by antiquing). The process of hand stitching is somewhat tedious, but I enjoy the repetition. Each stitch must be exactly the same; the order of inserting the needles, the positions of the thread, whether the second needle comes out above or below the first -- even the amount of tension applied to the thread -- all affect the final look of the stitch. Every item is a little challenge, and it's immensely satisfying when a line of stitches comes out perfect, without having to be cut out and started over.

In addition to the simple (Ha!) act of stitching, I also get excited because this is the first time a set of disparate pieces begins to resemble the item I'm actually making. The satisfaction that comes with making something that actually looks like the thing I set out to make cannot really be understated.
Finishing Touches
After stitching the pieces of the wallet together, it's time to trim or sand off any edges that don't line up (there usually are a few), and then protect those edges from wear. This is another thing that has as many techniques as there are leathercrafters. I experiment with different edge styles regularly, but my current go-to is to bevel, burnish, sand, burnish again, sand again, and then apply black edge kote, which helps to bind the fibers and protect the edge from wear. Finally I'll seal the edges with beeswax and a bit more burnishing to further bind the fibers and offer some protection from water. I've been happy with this process as it stands up very well to wear and tear. Other processes can produce shinier edges, but they rarely last long, so they're only really good to use on edges that won't see much stress.
This process usually takes an hour or two for a wallet-sized item. Edges are easy to rush, and it takes a lot of discipline to do them right. A rushed edge usually shows.
After edge finishing, all that's left is to open up the pockets with a bone folder, and then perhaps apply a final coat of wax or just give the whole item a good buffing.
Ready to Use
Below are the pictures taken immediately after finishing this wallet. It was a joy to create. Thanks for reading! Don't forget, you can own his one-of-a-kind wallet. There are additional pictures on the product page, as well.


More Like This
Browse Topics


What's the Deal with Stitching?

Have you ever noticed a stray thread on your shirt? Personally, I can never resist the urge to give it a yank. And inevitably, when I do, it runs, causing a row of stitches come loose and before I know it the seam is weakened or falling apart altogether. Stitching is something most of us these days take for granted. Machines do it for us quickly and cheaply, and that's that. This mentality is fine for an item which is not intended nor expected to last, but for truly durable goods, it's far from ideal.
4 minute read · Made to Last